Moonlander 2 Setup Windows
Preparation, Installation of USB2Serial Drivers, Installation and Configuration of BFGMiner Software for Windows 7 Systems (or higher)
Preparation
This manual describes the Installation of the Silicon Labs CP210x USB2Serial Driver which is necessar for the serial communication with your Miner via USB. It illustrates the installation of the custom BFGMiner branch for Moonlander 2 USB Stick Miners and the configuration of your mining software with a Mining Pool.
Installation of Silicon Labs CP201x USB2Serial Drivers
First, download the adequate version of the SiLabs USB2Serial driver for your system:
https://www.silabs.com/developers/usb-to-uart-bridge-vcp-drivers
- For Windows 7, 8 and 8.1 you will need to install the CP210x Windows driver version 6.x:
https://www.silabs.com/documents/public/software/CP210x_Windows_Drivers.zip - For Windows 10 you will need to install the CP210x Universal Windows driver which comes as version 10.x:
https://www.silabs.com/documents/public/software/CP210x_Universal_Windows_Driver.zip
Both drivers are available as 32-bit and 64-bit versions.
BFGMiner Futurebit Branch installation
Here you will find the BFGMiner Futurebit Branch as Binary downloads:
- for 32-bit versions of Windows 7, 8, 8.1 and 10:
bfgminer-5.4.2-futurebit2-win32.zip - for 64-bit versions of Windows 7, 8, 8.1 und 10:
bfgminer-5.4.2-futurebit2-win64.zip
Now we can configure the BFGMiners software to work with a Mining Pool.
For beginners we recommend getting an account with one of the well-known public Mining Pools for Litecoin or other Scrypt bases Cryptocurrencies. We recommend litecoinpool.org and Nicehash. We made good experiences with both of them and recommend them unreservedly.
Follow the instruction of you Mining Pool provider with the setup of at least one “Worker” for your new Moonlander 2. Workers are used to enable a distinct monitoring of every different miner you operate with the pool. Most pool also provide distinct statistical analysis for every single Worker.
You will find a “Start_Moonlander2.bat” Windows batch file which you will need to modify and update with your own Pool data and credentials:
bfgminer.exe --scrypt -o stratum+tcp://litecoinpool.org:3333 -u IhrUsername.1 -p 1,d=128 -S MLD:all --set MLD:clock=600
pause
The Pool configuration which is used in the example above should be replaced by your own pool configuration data. Please contact your pool operator or check the pool setup guide for more details. The example above shows a configuration for one of the best-known Litecoin Mining Pools.
The Clock Rate can be set with the following commandline parameter: –set MLD:clock=xxx.
Please note that this version of the miner has a fixed list of frequencies available to use below: 384, 450, 480, 540, 576, 600, 612, 625, 636, 648, 660, 672, 684, 700, 720, 744, 756, 768, 796, 832, 852, 876, 900, 924, 954.
The mining performance depends on your Clock Rate and Core Voltage setup. You can calculate the average hash rate using the following formula:
- Performance in MH = 5.66 * MHz
- Example MH = 5.66 * 832 => Hash power of approx. 4.7 MH/s (+-5%).
- The higher the hashrate, the bigger is the deviation from this average, caused by ASIC manufacturing tolerances.
Fine tuning
Please note: Voltage regulation should be done carefully and in very small steps. Never set a votage wich is outside the below mentioned range. This would most likely damage the ASIC if you run at high voltages and high clocks for prolonged periods of time. We do not replace miners which are damaged by inadequate clock rate and voltage settings.
If the miner does not start with high Clock Rates or produces HW error rates of 100% it may be necessary to adjust the (core-)voltage.
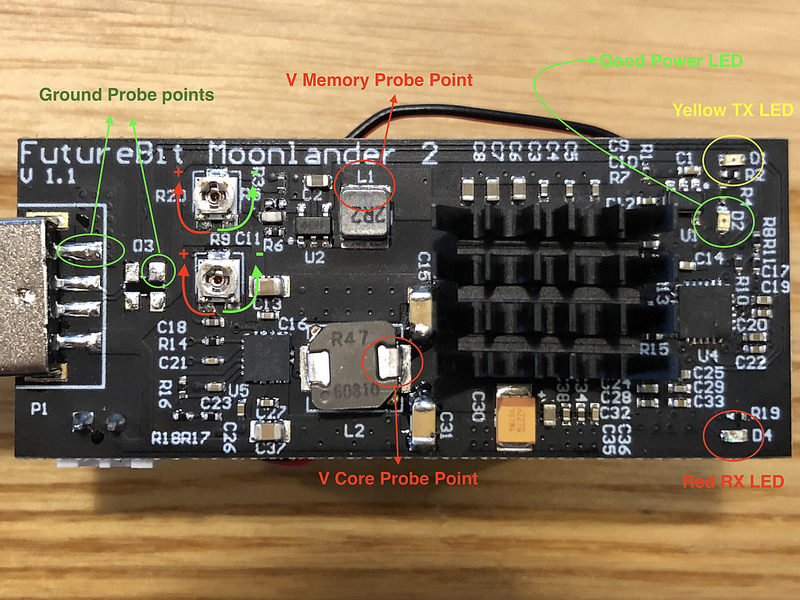
The miner is equipped with two small trimpods for voltage adjustment (one for core voltage, one for memory voltage)
Core voltage can be set between 0.625 V and 0.91 V and memory voltage between 0.65 and 1.05 V.
To turn the voltage up turn the pot clockwise, to turn it down, counterclockwise.
Make sure you have placed the stick horizontal and the USB end is facing left (you can read “FutureBit Moonlander” normally on the board).


Optimisation of clock rate and voltage
Basically, you can set anything between the following scenarios:
- Maximum hash performance with high clock rate and accordingly adjusted core-voltage at cost of a low power efficiency
- Maximum power efficiency with low clock rate and accordingly adjusted low voltage at cost of a low hash performance
A combination of both scenarios will lead to the following “sweet spot”:
- with a clock rate of 756 MHz and 0.725 V core voltage the ASIC operates close to the effciency maximum still showing a good hash performance. At “sweet spot” the miner can still be cooled adequately with the mounted heat sink and fan.
For enhanced support please visit the public support forum on bitcointalk.org or write us a e-mail.
