
2Pac Setup MacOS
Preparation, configuration and build with MacOS El Capitan (10.11.6) using the MacOS Packet Manager HomeBrew. Test and Pool Operation of the Miner. Older Version of MacOS may work but have not been tested.
Preparation
These instructions describe the installation and configuration of the MacOS package manager HomeBrew as a prerequisite for the installation of CGMiner. With the help of HomeBrew, all package dependencies are automatically resolved when installing the GekkoScience CGMiner branch. A user with administrative rights is required for the installation. Sudo rights are not necessary. Root itself is also not required (as usual with MacOS).
First step is to download and install HomeBrew:
/usr/bin/ruby -e "$(curl -fsSL https://raw.githubusercontent.com/Homebrew/install/master/install)"The Ruby script loads and installs HomeBrew for the Mac. Confirm the script prompts. HomeBrew can be used after installation. Packages are called TAPs in homebrew. The HomeBrew installation is updated with the help of the brew update command. The integrity of HomeBrew is checked with the help of the brew doctor command. Any issues reported by brew doctor must be fixed before GekkoScience CGMiner is installed.
brew update
brew doctor
Installation of GekkoScience CGMiner
With the brew tap command external packages from GitHub can be installed via Homebrew. The GekkoScience CGMiner branch (available on GitHub under vthoang / cgminer) can be cloned in HomeBrew as follows:
brew tap vthoang/cgminerAfter successful cloning from Git, the GekkoScience CGMiner is installed as follows:
brew install cgminerCGMiner will be installed in your Mac’s directory under ~ / vthoang / cgminer.
After that the binary can be tested as follows:
cd ~/vthoang/cgminer
./cgminer -n
This command lists the recognized Miner. “2Pac BM1384 Bitcoin Miner” should be displayed here.
Accessories
Most Macs can provide enough power for the operation of the 2Pac Miner via USB2 and USB3. Apple has extended the USB2 specification accordingly to be able to charge smartphones and tablets on the Mac. Nevertheless, a USB hub with an active power supply should be used, at least to adequately cool high-clocked 2Pac miners with a USB fan. For the operation of more than one 2Pac Miner an active USB hub, which is able to provide at least 2 A per USB port, is required. We have had good experiences with USB 2.0 devices from Anker and Orico, but we recommend our 7-Port USB Hub with 6-Pin PCIe Port and Barrel Plug.
For safe operation with a clock frequency of 150 MHz or more, we recommend using a suitable USB fan. We have had good experiences with the Arctic Breeze Mobile 92 mm. Very quiet, powerful and durable.
Setup
The command for starting the 2Pac with your newly installed Custom CGMiner is as follows (example):
cd ~/mining/newpac/cgminer
./cgminer -o stratum+tcp://pool.ckpool.org:3333 -u 1BURGERAXHH6Yi6LRybRJK7ybEm5m5HwTr -p x --suggest-diff 32 --gekko-2pac-freq 150
The pool data from the above example can be replaced with your own pool data. The example above illustrates operation in Con Kolivas Solo Mining Pool. The clock frequency can be changed by modifying the parameter gekko-2pac-freq. Continuous fanless operation is only recommended for frequencies up to 100 MHz.
The performance of the miner varies depending on the clock frequency and core voltage and can be approximately calculated using the following formula:
- Performance in GH = 0.11 * MHz
- Example GH = 0.11 * 150 => Runs with approximately 16.5 GH/s (+-15%)
- The bigger the hashrate, the more the performance varies with the manufacturing tolerances of the ASICs used.
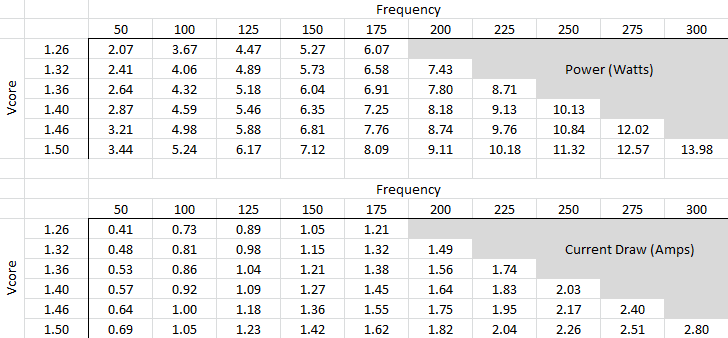
The power consumption of the miner (see figure):
For further help and support, we recommend taking a look at the support forum at bitcointalk.org (in English) or simply write us an e-mail.